If you’re an Amazon seller looking to list a new product as FBA (fulfilled by Amazon) instead of FBM (fulfilled by merchant), this guide is for you. Assuming you already have a seller central account and have listed products for sale, you will get started on the FBA process by logging into your account and clicking on “Inventory.” Once there, you will choose the product you want to change to FBA (if you have not already) by going to the far right-hand side of the listing and selecting “edit.” Under the drop-down menu, you will click on “Change to fulfilled by Amazon.”
Amazon will then ask you what type of barcode you would like to use. In this case, you’ll want to use the Amazon barcode or FNC to place on product packing. Using an FNC is much more straightforward than using a manufacturer barcode overall. At this point in the process, you will select “Amazon barcode” as the barcode type and move along to the “Convert & send inventory” button. On the next page, you will add any dangerous goods information if applicable. You can move along to the “Save & continue” button. Once your product is listed as an FBA product, you will follow the steps below to send and replenish inventory.
Sending & Replenishing Inventory Through Amazon FBA
Shipping Plan & Quantity
At this stage, you will select your “ship from” address as a business or home address.
Pro-tip: Select a California address if you want your product to go to a west coast warehouse. No guarantees, but this can help for high-volume products.
You will now move on to the packing type. If you want to pack more than one type of product (with different FNC codes) in one box, you will select “Individual products.” If you are shipping many of the same products, you will choose “Case-packed products.” From here, you will continue to the shipping plan.
Amazon will now ask you how many products you are sending in, units per case, and boxes total. For example, if you have 500 cases with ten units per case, you would have 5,000 total units. An important thing to note here is that Amazon often limits the number of products that new sellers can ship during Q4. Right now, the limit is 200 units. So, what do you do if you want to sell more units than what Amazon currently allows? I recommend sending as many units to Amazon as permitted and keeping the rest at your business or home. If you do not have room to store products, use a 3PL or a third-party logistics company to ship the products for you and send them to Amazon down the line when restrictions are lifted.
Select quantities and hit “Continue.”
Prepare Products
Amazon has prep services in place. For example, if you need bubble wrap or styrofoam, Amazon will provide it for an expensive fee. I recommend saving yourself some money by doing this part at home or have your manufacturer do it for you. You will select prep guidance (i.e., bubble-wrap) and then choose who will prep (i.e., merchant). Go to the seller central forums to get advice on packing materials.
Once your options are selected, hit “continue.”
Label Products
Now, you can move on to labeling. Amazon charges about twenty cents per unit to label products, so I would advise against that and do it yourself. Select “merchant” as the labeler and type in the number of labels you would like to print. The number of labels will correspond to the number of units. You can now print the labels directly from this page. You can use your home printer to print or have your manufacturer do it for you.
Once your options are selected, hit “Continue.”
Review Shipments
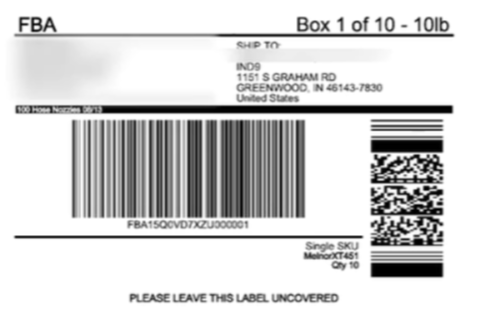
Amazon allows sellers to name and save their shipping plans which is super helpful. For example, if you are shipping ten hose nozzle units in ten boxes (100 total), you can name your shipping plan “100 hose nozzles [date]” so you can decipher between shipments. Amazon will then show you the warehouse you will be shipping to. It will be the nearest fulfillment center to your send from address.
If you are forwarding freight from another country like China, you will use the provided warehouse code to give your freight forwarder. An example of this code would be “IND9” for an Indiana warehouse. There is a possibility that Amazon will split your boxes up between warehouses, but this does not typically happen to new sellers.
Once done, hit “Approve & continue.” Amazon will then direct you to the “View shipments” tab, where you will look everything over once more and select “Work on shipment.”
Prepare Amazon FBA Shipments
Now, you have made it to the grand finale of the Amazon FBA shipment process. Here, you will choose your shipping method. You will select either SPD (small parcel delivery) to ship individual boxes or LTL (less than truckload) to ship pallets of 150 lbs or more.
Now, you will determine your shipping carrier. Amazon recommends UPS and offers a discount for using them. You will pay for UPS shipping through Amazon. DHL is a common carrier for shipments coming from China, and you will pay your freight forwarder directly.
Next, decide how the shipment will be packed; everything in one box or multiple boxes. In the example used above for 100 units, we would select “multiple boxes.” You will then input units per box and the number of packages again.
Continue to add box weights and dimensions and try to be accurate here. Amazon does not like boxes over 50lbs or larger than 25x25x25. Hit “Confirm” Add another box configuration if you have multiple box sizes and/or weights. Amazon will then calculate your shipping charges for the information you entered. You will “Accept charges” and select paper type for your shipping labels. Next, add the date you plan to ship the product(s) out and “Print box labels.” There will be different labels for carriers like DHL or for pallet shipments (see photo example below)
Now you can place labels on your boxes and get them shipped. Hit “Complete shipment.”
Summary
Once the carrier scans your boxes, you can see your packages’ tracking number and status in the summary section. If you ever need to check on your shipments, you can click on “Manage FBA shipments” from the “inventory” drop-down on the main seller central menu.
Congratulations, you have now completed your first Amazon FBA shipment!
Check out some helpful video tutorials here if you are just getting started selling on Amazon: